Docker with React, changes reflect real-time inside a container
Combine create-react-app with docker

What is Docker?
Docker is a platform for building running and shipping applications in a consistent manner so if your application works on your development machine it can run and function the same way on other machines. If you have been developing software for a while you’ve probably come across the situation where your application works on your development machine but doesn’t somewhere else. Can you think of three reasons why this happens?
- This can happen if one or more files are not included as part of your development so your application is not completely deployed, it’s missing something.
- This can happen if the target machine is running a different version of some software that your application needs. Let say, your application needs node version 14 but the target machine is running node version 9.
- This can also happen if configuration settings like environment variables are different across these machines.
And this is where Docker comes to the rescue. With Docker, we can easily package our application with everything it needs and runs it anywhere on any machine with Docker. So if your application needs a given version of node and mongoDB, all of these will be included in your application package. Now you can take this package and run it on any other machine that runs Docker. So if it works on your development machine it’s definitely going to work on your test and production machines.
Now there’s more, if someone joins your team they don’t have to spend half a day or so setting up a new machine to run your application. They don’t have to install and configure all these dependencies. They simply tell Docker to bring up your application and the Docker itself will automatically download and run these dependencies inside an isolated environment called a container. And this is the beauty of docker, it provides an isolated environment that allows multiple applications to use different versions of some software side by side. So one application may use node version 14, another application may use node version 9, both these applications can run side by side on the same machine without messing with each other. So this is how Docker allows us to consistently run an application on different machines.
Now there’s one more benefit here. When we’re done with this application and don’t want to work on it anymore, you can remove the application and all its dependencies in one go. Without docker, as we worked on different projects our development machine gets cluttered with so many libraries and tools that are used by different applications. And then after a while, we don’t know if we can remove one or more of these tools. Because we are always afraid that we will mess up with some applications. With Docker, we don’t have to worry about this because each application runs with its dependencies inside an isolated environment. We can safely remove an application with all its dependencies to clean up our machine. Isn’t that great? So in a nutshell Docker helps us consistently built, run, and ship our applications.
And that is why a lot of employers are looking for people with Docker skills these days. So if you are pursuing a job as a software or DevOps engineer, I highly encourage you to learn docker and learn it well.
Installing Docker and create react project:
You can download and install docker from multiple resources. Following is the link that helps you to download as per your operating system:
Link to download docker on your machine.
Once you install the docker, you can run the following command to verify:
docker --version
Now, we are going to install a fresh react application:
npx create-react-app my-reactGo to the project folder and run localhost:3000 in the browser, you will see the running react application in your browser. Now stop the application and remove the node_modules folder from your host react app.
NOTE: We are removing node_modules from our local react application, we will be installing all npm dependencies inside the docker container only.
Dockerize the React App:
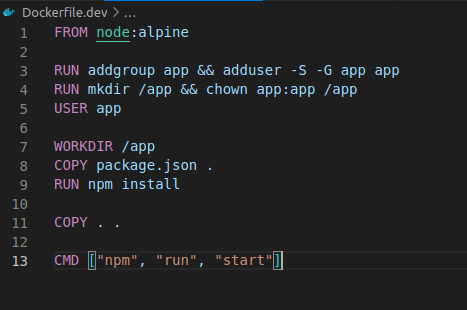
Now open the project in the text editor and create a new file at the root of the project, name Dockerfile.dev. We use this file for our development purpose. First I show you the docker.dev file and then will explain every line:
Explaining Docker File:
FROM node:alpinewe are grabbing the latest node version from the docker hub and specifying the Linux distribution Alpine. We can use any Linux distribution but Alpine is the smallest in size and thus leads to a small size docker image.RUN addgroup app && adduser -S -G app appwe are making a new group (named app) and adding a new user (named app) inside the Docker container. By default, Docker uses the root user to perform all the tasks but for security purposes, we are making a separate user that handles the further tasks.RUN mkdir /app && chown app:app appwe are making a new folder app from the root user and change the ownership of the app folder to the app user inside the app group inside the Docker container.USER appswitch from root user to the app user.WORKDIR /appgo to the app folder inside the Docker container.COPY package.json .we are copying the single package.json file to the app folder and the rest will be copied later. Copying a single package.json file is better for performance. If we copy all the files in one step then every time we build the image all the npm dependencies will be installed again and it takes too much time, even if we didn’t add any npm dependency.RUN npm installwe are installing all the npm dependencies.COPY . .copy all other files as well.CMD ["npm", "run", "start"]run the development server of create-react-app
.dockerignore file:
Just like .gitignore, some of the files or folders we don’t want to include in the Docker file. So, create a .dockerignore file at the root of the project and add node_modules like below:

Build a Docker image from Dockerfile.dev file:
Now our Docker file is ready, we are now making an image from this Docker file. Run the following command inside the project(where you placed the Dockerfile.dev), I will explain it later:
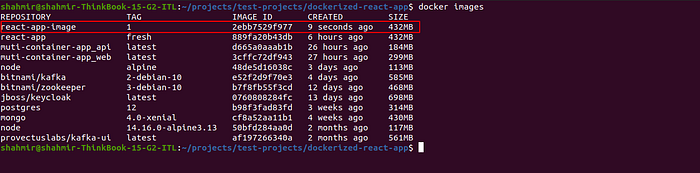
docker build -t react-app-image:1 -f Dockerfile.dev .-twe are tagging the docker imagereact-app-imageIt is the image name and1is the version number.-f Dockerfile.devis used if you build a Docker image from non Dockerfile. By convention, the Docker image is built with Dockerfile (not Dockerfile.dev). So, if you are using the Dockerfile, you don’t need to specify the-fflag..explains that the Docker file is in the current directory. If it is placed in some other directory then we have to write the whole PATH.
Check Docker locally:
The following command is used to check the docker images on your local machine:
docker images You will get the following output:
Run a Docker container from a Docker image:
We have created the Docker image, now we have to execute the following command to run the Docker container:
docker run -p 3000:3000 --name dockerized-react-app react-app-image:1Explaining the above command:
-p 3000:3000By default react application runs on port 3000. So we are mapping the port of localhost machine to the port of the Docker container. 3000:3000 means localhost machine port:Docker container port.— name dockerized-react-appWe named the docker containerreact-app-image:1It is the name of our Docker image (that we created in the above steps).
If you open localhost:3000 in your browser, we will get the running react application.
Introducing Docker Volume for getting real-time changes:
React application is running fine inside the Docker container but if you try to make some changes in your react application, those changes are not reflected in the browser. So, every time we make some little change we need to build the whole image again and then run the container which is not the best solution. So, I will be using a different command to run the react application inside the docker container and after that, I will explain it.
First, stop the command line by pressing CTRL + C, remove the running container by executing the following command:
docker rm -f dockerized-react-appNow run the following command that reflects changes in real-time:
docker run -d -p 3000:3000 -v /app/node_modules -v $(pwd):/app --name dockerized-react-app react-app-image:1-dUsed this command in detach mode. If you execute the command with a-dflag, you can execute more CLI commands in the same window.-v /app/node_modules -v $(pwd):/appCopy everything (every file and folder) of the current folder and copy it to the app directory inside the docker container except the node_modules folder (as there is no node_modules folder in our host machine, we removed it at the start).
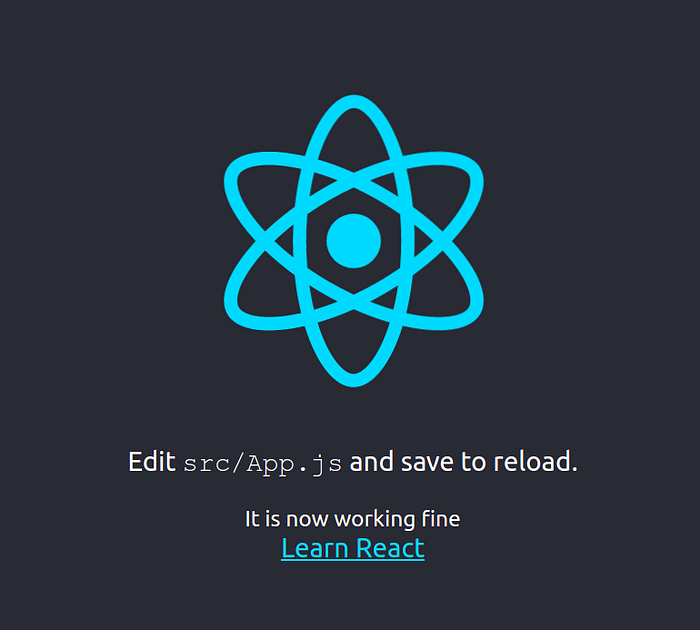
Open the browser and type localhost:3000, you will see that the react application is running. Now, if you make any change in your code, it will be reflected in the browser. Take a look below:
Here we go, everything is working fine. Hopefully, this article will help you a little to get started with Docker and how we can use it with modern libraries and frameworks. Thanks.
